Planting a Creeping Thyme Lawn: Plugs vs Seed vs Mats & First-Year Care
Lead Turfgrass & Lawn Care Specialist at Totally Green Lawn · Certified Turfgrass Specialist (CTS), Master Gardener, B.S. in Agronomy & Turf Science · 14+ years in residential turf management, organic fertilization, and weed science
Most people plant creeping thyme the same way they'd plant a tomato, and that's exactly why it dies. Creeping thyme (Thymus serpyllum) wants lean, gritty, fast-draining soil, not the rich, moisture-holding bed most garden plants love. The good news is that learning how to prepare soil for planting creeping thyme lawn is mostly about undoing what your lawn already does well.
Creeping thyme thrives in sandy or rocky soil with a pH between 6.5 and 8.0, full sun, and sharp drainage. University extension guides across the arid West and the UK consistently describe it as a Mediterranean herb that punishes gardeners who "improve" their soil too much. Get those three conditions right, and the rest of the work is just patience while it fills in.
Quick Answer
Prepare soil for a creeping thyme lawn by testing drainage and pH first, removing all existing turf and weeds, loosening the top 6 to 8 inches, and amending with coarse sand or fine gravel. Skip the compost. Aim for a pH of 6.5 to 8.0.
Rake level, water once, and let the bed settle for one to two weeks before planting.
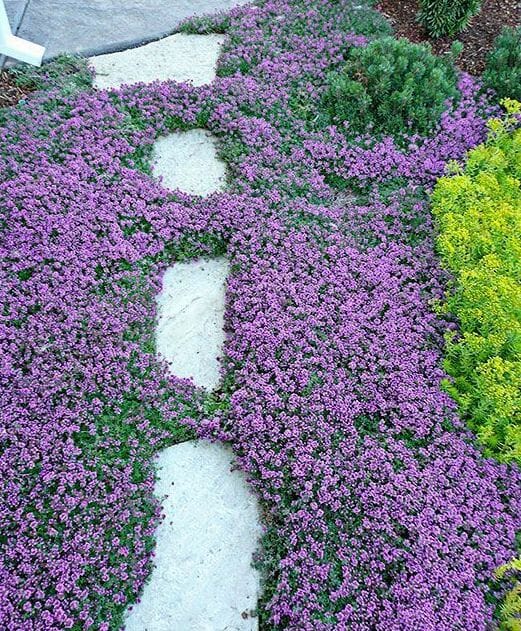
Image source: Bing (Web (fair-use with source credit))
Is Creeping Thyme the Right Lawn for Your Yard?
Before you touch a shovel, run through a quick gut-check. Creeping thyme isn't a universal lawn swap. It's a ground cover that happens to look like a lawn, and it has firm opinions about where it grows.
If your yard hits the conditions below, you're a strong candidate:
- 6 or more hours of direct sun daily. Thyme flowers and stays tight in full sun. In shade, it stretches, thins, and eventually rots out.
- Soil that already drains fast. Sandy lots, raised beds, rocky slopes, and the dry strip between a sidewalk and a fence are ideal.
- USDA Hardiness Zones 4 through 9. Most common varieties handle these zones, though the exact range depends on the cultivar you pick.
- Low to moderate foot traffic. Creeping thyme handles occasional walking, but it's not a soccer field. For paths, lay stepping stones through the planting.
If your yard is heavy clay, stays soggy after rain, or sits in dappled shade under trees, you can still grow creeping thyme, but you'll need to do more soil work or pick a wetter-tolerant ground cover instead. As of 2026, that's the most common reason new thyme lawns fail: the spot simply wasn't right to begin with.
A simple rule of thumb. If you've ever struggled to grow lavender or rosemary in the same bed, creeping thyme will probably thrive there. If lavender rotted out, save yourself the trouble and look at sedum or moss instead.
Diagnose Your Soil and Site Before You Dig
This is the step most guides skip, and it's the one that decides whether your thyme lawn looks like a carpet or a polka-dot mess in year two. Spend an hour here and you'll save a full season of replanting.
Run a Drainage Test First
Dig a hole about 12 inches deep and 12 inches wide. Fill it with water and let it drain completely. Then fill it again and clock how long it takes to empty.
| Drainage Result | What It Means for Thyme |
|---|---|
| Water gone in under 30 minutes | Excellent. Plant directly. |
| Water gone in 30 to 60 minutes | Acceptable. Add coarse sand to be safe. |
| Water still standing after 1 hour | Poor. Heavy soil work required, or reconsider the spot. |
Test Your pH
Creeping thyme prefers a pH between 6.5 and 8.0, which is neutral to slightly alkaline. Most home soil tests use a probe or strip kit, and either works fine for this range.

Image source: Bing (Web (fair-use with source credit))
If your soil comes back below 6.0, you'll need to raise the pH. The standard fix is garden lime, worked into the top 6 inches according to the bag's rate chart for your soil type. University extension services publish reliable lime application tables for home gardens if you want a research-backed number rather than a guess.
If your pH is already in range, leave it alone. Don't add lime "just because."
Identify Your Soil Texture
Grab a handful of moist (not wet) soil and squeeze it.
- Sandy or gritty: Falls apart the moment you open your hand. Almost no prep needed beyond weeding.
- Loamy: Holds a loose clump but crumbles easily. Good baseline, light amendment.
- Clay: Forms a sticky ball, ribbons between your fingers, and stays muddy. Needs serious grit and possibly raised beds.
- Rocky or gravelly: Often perfect. Just remove weeds and large stones.
Map the Sun
Walk your yard at three times on a sunny day: mid-morning, noon, and mid-afternoon. Note where the shadows fall. If any part of your planned thyme area gets fewer than 6 hours of direct light, either prune back the source of shade or shrink the planting zone.
Thyme in shade is a slow death, not a slow growth.
The Step-by-Step Soil Prep Workflow
Once you've confirmed the site and tested the soil, the actual prep is a straightforward weekend project. Work in this order. Don't skip ahead, because each step sets up the next.
1. Kill and Remove Existing Vegetation
You have three real options here, and the right one depends on your timeline and how much turf you're fighting.
| Method | Best For | Timeline |
|---|---|---|
| Hand sod removal (sod cutter or sharp spade) | Small areas, instant results | 1 to 2 days |
| Smothering with cardboard + 4 inches of mulch | Large areas, no machinery | 8 to 12 weeks |
| Solarization (clear plastic for 6 to 8 weeks) | Hot, sunny climates with weed issues | 6 to 8 weeks |
Smothering is the easiest DIY method. Lay plain corrugated cardboard (no glossy print, no tape), overlap seams by 6 inches, then cover with 4 inches of wood-chip mulch. Wait at least two months.
The grass and weeds underneath die and turn into compost, leaving you with a clean slate and zero herbicide.
2. Strip the Top Layer and Loosen the Subsoil
Once the existing vegetation is dead, remove the mulch and cardboard. Then loosen the top 6 to 8 inches of soil with a garden fork or tiller. You don't need to flip it over.
Just break up compaction so young thyme roots can push through.
If you're working with heavy clay, this is also the moment to dig a bit deeper. A 10 to 12 inch loosened zone gives the bed a fighting chance to shed water.
3. Amend for Drainage, Not Fertility
Here's the part that surprises most gardeners. Creeping thyme grows poorly in rich soil. Too much nitrogen and you get floppy, leggy plants with few flowers.
Too much compost and the bed holds water like a sponge.
What thyme does want is grit. Work coarse builder's sand or fine pea gravel into the top 4 to 6 inches at roughly a 1:1 ratio with your existing soil for clay sites. For loamy or sandy sites, a light 1 to 2 inch top-dressing of sand worked into the surface is plenty.

Image source: Bing (Web (fair-use with source credit))
Skip the bagged manure. Skip the peat moss. Skip the moisture-retaining "garden soil" mixes.
All three will work against you.
4. Rake, Level, and Water In
Rake the bed smooth. You're aiming for a flat, even surface with no low spots where water can pool. A landscape rake works, but a regular garden rake is fine for small areas.
Water the bed lightly and let it settle for 7 to 14 days. This step pulls out hidden air pockets, gives weed seeds a chance to sprout (so you can pull them), and lets the soil reach its final grade before you plant.
5. Plant According to Method
Your planting method changes the prep slightly:
- Seed: Lightly rake the surface one more time so seeds have soil contact. Press them in with a board, don't bury them. Thyme seeds need light to germinate.
- Plugs: Dig holes the same depth as the root ball, twice as wide. Space 6 to 12 inches apart, closer if you want faster coverage.
- Sod mats: Lay them like carpet, staggering the seams the way you'd lay brick. Press firmly so roots contact the soil.
6. Water Once, Then Back Off
Give the new planting a deep initial soak. After that, water only when the top inch of soil dries out. Overwatering is the fastest way to kill young thyme, especially in the first 6 weeks.
Picking Your Planting Method: Seed, Plugs, or Mats
Each method works. They just trade off cost, speed, and how much patience you have.
| Method | Cost per Sq Ft (as of 2026) | Time to Full Coverage | Best For |
|---|---|---|---|
| Seed | $0.10 to $0.30 | 1 to 2 growing seasons | Large budgets, patient gardeners |
| Plugs | $0.75 to $1.50 | 3 to 6 months | Mid-size projects, faster results |
| Sod mats | $2.00 to $4.00 | Instant (after rooting) | Small areas, instant gratification |
Seed: Cheapest, Slowest
A quarter pound of creeping thyme seed covers about 1,000 square feet, which is why it's the go-to for big lawn conversions. The catch is germination. Thyme seed is slow and erratic, often taking 14 to 28 days, and you'll likely get patchy coverage the first year.
Expect to overseed bare spots in year two.
Soil prep for seed is the same workflow above, with one extra step: rake the top quarter inch of soil extra fine so the tiny seeds have contact. Don't mulch over the seed. A light mist of straw or a floating row cover helps keep birds and erosion off it.
Plugs: The Middle Ground
Plugs are small potted starts, usually in 2 to 3 inch cells, that you space across the bed. At 6 inch spacing you get fast coverage, at 12 inch spacing you save money but wait longer. Most home gardeners land at 8 to 10 inches apart.
Plugs tolerate less-than-perfect soil better than seed because they arrive with established root systems. They still need the same prep, but they're more forgiving if you skipped a step.
Sod Mats: Instant, Pricey
Sod mats are pre-grown creeping thyme in thin biodegradable backings. You unroll them, water, and you've got a "lawn" the same day. They're great for small patches, between stepping stones, or for homeowners who don't want to wait.
The prep is identical to plugs. The only difference is that mats need closer attention to watering for the first two weeks while roots reach down into your prepared bed.
Mistakes That Kill Creeping Thyme Lawns
Most creeping thyme lawns don't fail because of bad seed. They fail because the soil was too rich, too wet, or too shaded. Here are the patterns we see over and over in the research, and the small adjustments that fix each one.
Over-Amending With Compost or Manure
This is the single biggest mistake. Compost is wonderful for tomatoes, peppers, and roses. For thyme, it's poison.
Rich soil pushes soft, leggy growth that flops open, flowers poorly, and dies back in wet weather.
If you've already added compost, don't panic. Top-dress the bed with 1 to 2 inches of coarse sand and let rainfall slowly dilute the organics over a season.
Planting in Shade
Thyme needs 6 or more hours of direct sun. Less than that, and you'll see long stems reaching for light, sparse flowering, and die-back in winter. There's no soil fix for this.
Either prune back the shade source or pick a different ground cover like sweet woodruff or pachysandra.
Watering Like a Lawn
New gardeners often water thyme on the same schedule as turf grass. That's too much. Once established, creeping thyme is genuinely drought tolerant and prefers dry feet.
Water only during extended droughts, and only if the plants start to wilt.
Planting at the Wrong Time
Hot summer planting in the Southwest or deep-winter planting in the North will both stress young thyme. Aim for soil temperatures between 60 and 70°F, which usually means spring after your last frost, or early fall about 6 weeks before your first frost.
Skipping the Settling Period
If you plant the same day you amend, the soil shifts as it settles and you end up with air pockets, low spots, and exposed roots. The 7 to 14 day wait mentioned in the prep workflow isn't optional. It's the step that prevents the replanting you'd otherwise do in spring.
The First Year: Watering, Weeding, and Filling In
The first growing season is mostly about keeping weeds out and water steady. Once thyme hits year two, it largely takes care of itself.
Watering Schedule by Stage
| Stage | Frequency | Goal |
|---|---|---|
| First 2 weeks after planting | Light daily watering | Keep top inch moist, never soggy |
| Weeks 3 to 6 | Every 2 to 3 days | Encourage deeper roots |
| Months 2 to 6 | Weekly if no rain | Drought conditions only |
| Year 2 and beyond | Only during extended drought | Mimic Mediterranean climate |
Weed Control Without Chemicals
Hand-pulling is the standard, and it's easier with thyme than with most ground covers because the soil stays loose and dry. Weed every 2 to 3 weeks during the first summer. Once thyme fills in, weed pressure drops sharply because the dense mat shades out new seedlings.
Avoid pre-emergent herbicides near young thyme. Most labels warn against use on edible herbs, and even ornamental varieties can take root damage from common products.
Filling Bare Spots
Even with great prep, you'll get some patchiness in year one. That's normal. Press a few seeds into any bare patch in early fall, or transplant a small clump from a thicker area.
By year two, most well-prepped thyme lawns hit full coverage.
Light Pruning and Edging
After the main bloom in midsummer, give the entire planting a light trim with shears. Cut back by about a third. This encourages a second flush of growth and keeps the mat tight instead of woody in the center.
Edging along paths and beds keeps creeping thyme from migrating into lawns or borders where you don't want it.
Creeping Thyme vs. Other Low-Water Lawn Alternatives
Creeping thyme is a strong pick, but it's not the only one. Here's how it stacks up against the most common substitutes in real-world conditions.
| Ground Cover | Water Needs | Foot Traffic | Sun | Best For |
|---|---|---|---|---|
| Creeping thyme (Thymus serpyllum) | Very low | Light to moderate | Full sun | Pollinator lawns, slopes, paths |
| Dutch white clover | Low to moderate | High | Full sun to part shade | Family yards, pet areas |
| Sedum (Sedum acre, Sedum rupestre) | Very low | Light | Full sun | Rocky soil, green roofs, hot climates |
| Corsican mint | Moderate | Light | Part shade | Moist, shaded paths |
| Buffalograss | Low | High | Full sun | Prairie regions, true lawn feel |
When Creeping Thyme Wins
Pick thyme if your top priority is pollinator value, fragrance, and a flower show in summer. It also wins on dry slopes where erosion is a concern, because the dense root mat holds soil better than sedum or clover.
When Something Else Fits Better
If you have kids or dogs running across the yard every day, clover or buffalograss will hold up better. If your "lawn" is mostly shaded, thyme won't thrive no matter how good your soil is. In that case, Corsican mint or wild ginger are kinder matches.
The USDA NRCS plant database is a useful cross-check for matching a species to your specific region and soil type before you commit.
Cost and Time Comparison
As of 2026, creeping thyme seed remains the cheapest way to cover a large area, with plugs and sod mats running 3 to 10 times the cost per square foot. Clover and buffalograss seed are similarly priced but establish faster, which is worth weighing if you're converting a high-visibility front yard.
Creeping Thyme Lawn FAQ
How long does creeping thyme take to fully spread?
From seed, expect one to two full growing seasons for full coverage. From plugs spaced 8 to 12 inches apart, you'll see fill-in within 3 to 6 months. Sod mats give you an instant surface, but roots still need 4 to 6 weeks to anchor.
Can you walk on creeping thyme?
Yes, but lightly. Creeping thyme handles occasional foot traffic, which is why it works between stepping stones and along path edges. It will not survive a daily shortcut across a yard, and the stems can snap under heavy pressure.
Does creeping thyme come back every year?
It does in USDA Hardiness Zones 4 through 9. The top growth dies back in winter, but the root system stays alive and pushes fresh growth in spring. In colder parts of Zone 3, it may not survive without heavy snow cover.
Do you need to mow a creeping thyme lawn?
Most homeowners never mow. A light trim after the main bloom in summer is enough to keep the mat tight. If the planting does get leggy in year three or four, set a mower to its highest height and take only the top third.
Is creeping thyme safe for dogs and kids?
Yes. Creeping thyme is non-toxic to humans, dogs, and cats, and it's a popular choice for family yards. The fragrance is a bonus, since the leaves release a mild herbal scent when brushed or stepped on.
What's the best time of year to plant?
Spring after your last frost, or early fall about 6 weeks before your first frost. Both windows give roots time to establish before the plant faces heat stress or deep cold. Avoid midsummer planting in hot climates and avoid any planting when the soil is below 50°F.
🧪 Agronomist Recommended: Soil pH Testing & Aeration Gear
Healthy root systems require balanced soil chemistry and loose structure. Our field testing recommends calibrated digital testers and biological aerators:
- Digital Soil pH & Moisture Tester:Check Digital Lawn Soil pH Testers on Amazon →
- Liquid Soil Aerator & Penetrant:Check Liquid Soil Aerators & Conditioners on Amazon →
*FTC Disclosure: As an Amazon Associate, Totally Green Lawn earns from qualifying purchases.*

Similar Posts