How to Clean Microscopic Jets in a Small Engine Carburetor
Lead Turfgrass & Lawn Care Specialist at Totally Green Lawn · Certified Turfgrass Specialist (CTS), Master Gardener, B.S. in Agronomy & Turf Science · 14+ years in residential turf management, organic fertilization, and weed science
You pull the cord, the engine coughs, and then it dies. Nine times out of ten, that's a microscopic jet in the carburetor choking on varnish, dust, or stale fuel. Knowing how to clean microscopic jets in small engine carburetor assemblies is the difference between a five-dollar fix and buying a whole new carb.
The good news: those orifices are tiny, often between 0.020 and 0.060 inches in diameter, but they're built to be cleaned. With the right tools and a steady hand, you can usually restore idle quality and throttle response in under an hour. As of 2026, most OEM service manuals still recommend the same disassembly-plus-soak-plus-blow-out sequence, and that's exactly what we'll walk through below.
Quick Answer
Remove the carburetor from the engine. Disassemble the float bowl. Identify the pilot jet and main jet.
Soak them in carburetor cleaner for 10 to 30 minutes. Blow them out with compressed air. Use a single strand of correct-gauge wire only if needed.
Reassemble carefully. Reinstall and adjust idle mixture.
Why Cleaning Microscopic Jets Isn't a "Spray and Pray" Job
A clogged jet doesn't look like much. It's a brass disc with a hole, sometimes smaller than a pencil lead. But that hole controls how much fuel the engine gets at idle (pilot jet) or at full throttle (main jet).
Even a 10% reduction in flow is enough to make a mower bog, a generator surge, or a chainsaw quit under load.
The problem with "spray and pray" cleaning, where you just blast carb cleaner into the intakes with the carb still on the engine, is that the cleaner rarely reaches the jet orifice. The float bowl sits between the spray and the jet. Varnish sits at the bottom of the bowl.
The actual blockage is buried inside a passage you can't see.
A proper job means pulling the carb, taking it apart, and looking at every jet under light. That's how you know whether you're dealing with varnish, a piece of debris, or a damaged jet that needs replacement.
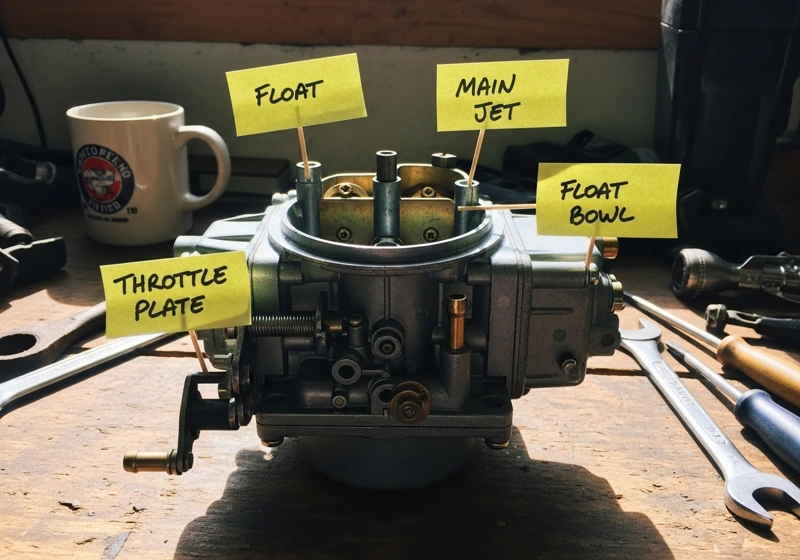
Image source: Bing (Web (fair-use with source credit))
If your engine is dying only when warm, surging at half-throttle, or idling rough after sitting for a few weeks, the pilot jet is your prime suspect. If it revs fine but bogs on load, look at the main jet. Most weekend mechanics get this backwards.
The Anatomy of a Small Engine Carburetor: Where Those Tiny Jets Live
Before you touch a screwdriver, it helps to know what you're looking at. Most small engine carbs (Briggs & Stratton, Honda GX series, Walbro, Tillotson, Keihin) share the same basic layout. The differences are mostly in size and adjustability.
Here's what's inside a typical side-draft or down-draft carb:
| Component | What It Does | Where to Find It |
|---|---|---|
| Float bowl | Holds a small fuel reservoir | Lower half of the carb, usually held by one or two screws |
| Float + needle | Maintains a constant fuel level | Inside the bowl, pivoting on a pin |
| Pilot jet (slow jet) | Controls idle and low-RPM fuel | Threaded into the carb body, often near the throttle plate side |
| Main jet (high-speed jet) | Controls fuel at higher RPM and load | Center or bottom of the bowl on most designs |
| Emulsion tube | Bleeds air into the main circuit for better atomization | Sits above the main jet on some carbs |
| Idle mixture screw | Adjusts the air/fuel ratio at idle | External, with a spring behind it |
| Throttle plate | Controls airflow into the engine | Inside the venturi, on the throttle shaft |
A few important things to know about the jets themselves:
- They are almost always brass. Soft, easy to damage if you use the wrong tool.
- The orifice is precision-sized. Pilot jets commonly run from #35 to #45, main jets from #80 to #130. These are not the same sizes as drill bits.
- On some carbs, the main jet is a single piece. On others, it unscrews and an emulsion tube sits underneath it. Mix those up on reassembly and you'll get a flat spot at mid-throttle.
- Idle mixture screws are preset at the factory, usually 1.5 to 2.5 turns out from lightly seated. Count your turns before you remove it.
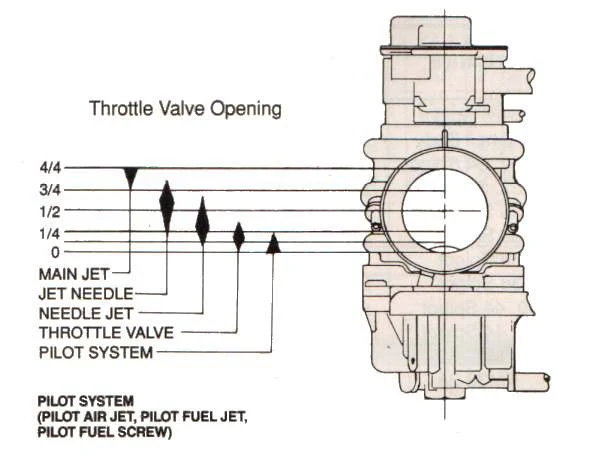
Image source: Bing (Web (fair-use with source credit))
If you've never done this before, take photos at every step. A phone full of "where did this spring go" images will save you an afternoon.
What You'll Need (And What to Never Touch)
You don't need a full machine shop. But you do need the right tools, and more importantly, you need to know which "helpful" items you should leave in the drawer.
The safe toolkit
- Carburetor cleaner spray (Berryman B-12 Chem-Dip, CRC, or equivalent)
- Compressed air with a fine nozzle (max 30, 40 psi on jets; full shop pressure is too much)
- Jet cleaning wires (Denco jet cleaning tool set, or a dedicated carb tool kit) in the right gauge
- Phillips and slotted screwdrivers that actually fit the jets
- A small container or jar for soaking
- Nitrile gloves and safety glasses (carb cleaner is nasty stuff)
- A magnifying loupe or bright flashlight for inspection
- Clean rags, lint-free if possible
- A rebuild gasket kit (cheap insurance; gaskets rarely survive a full teardown)
What to never touch
- Drill bits or metal picks. A drill bit is steel, harder than the brass jet. One slip and you've permanently oversized the orifice. That jet is now scrap.
- Wire from a coat hanger. Same problem. Wrong gauge, wrong hardness.
- Toothpicks in a pinch are okay for float bowl passages, but never for jets. The wood can break off inside.
- Carb cleaner on rubber or plastic parts. It dissolves most gaskets, O-rings, and plastic floats. Keep spray off anything that flexes.
Manufacturer service bulletins from Honda and Briggs & Stratton consistently warn against using anything harder than brass to clean a brass jet. If you stick a steel wire in, you risk scoring the jet wall, which then catches debris and clogs again within days.
One more thing on safety: carb cleaner is highly flammable and the fumes are no joke. Work outside or in a garage with the door open. Per OSHA solvent handling guidance, you want ventilation, gloves, and eye protection every single time.
Step-by-Step: Cleaning Microscopic Jets the Right Way
This is the heart of the job. Take your time on the first three steps. They decide whether the rest goes smoothly or whether you end up chasing a new problem.
Step 1: Remove the carburetor safely
Disconnect the fuel line (expect a small fuel spill, have a rag ready). Remove the air filter housing so you can see the linkages. Take a clear photo of the throttle and choke linkages from two angles.
Mark or photograph the position of the throttle cable.
Unbolt the carb, typically two nuts or bolts on the intake manifold. Gently pull it off, watching for the insulator gasket between the carb and the engine. Set that gasket aside carefully; you can reuse it if it's not torn.
Step 2: Disassemble the float bowl
Lay the carb on a clean rag. Remove the float bowl screws. Lift the bowl straight off, not at an angle, so you don't bend the float pivot pin.
The float and needle may come out with the bowl, or they may stay in the body. Don't lose the small spring under the needle.
Drain any remaining fuel into your approved container. Now's a good time to look inside the bowl. Varnish looks like a thin brown film.
Water droplets collect at the bottom and signal a fuel storage problem, not just a carb problem.
Step 3: Identify and remove the jets
This is the step that trips up most beginners. The pilot jet (idle) and main jet (high-speed) often look almost identical at a glance, especially on a used carb covered in dirt. Before you unscrew anything, do this:
- Look at the carb from below with a flashlight. The main jet is usually in the center, the pilot jet is offset toward the throttle plate side.
- A photo of the specific carb model online (Briggs part number stamped on the body, or Honda model) will show you exactly which is which.
- When in doubt, don't fully remove both at once. Remove one, set it in a labeled container, then remove the other.
Use the correct screwdriver and apply steady downward pressure while turning. These jets have small slots, and a slipped screwdriver will round them out instantly. If a jet won't budge, hit it with a short burst of penetrating oil and wait 10 minutes, don't force it.
Step 4: Soak the jets in carb cleaner
Drop both jets into a small jar of carb cleaner. The cheap "spray on" version works, but the dip-style can (Chem-Dip, Gunk Carb Medic) holds the parts submerged and does a better job. Manufacturer soak times on the can typically run 5 to 30 minutes.
We err toward the longer end for stubborn varnish.
Don't soak the float bowl gasket, the float, or any rubber parts. Take those out first. While the jets soak, this is a great time to scrub the float bowl and throttle body with a soft brush and carb cleaner spray.
Step 5: Blow out the jets with compressed air
After soaking, hold each jet up to a light. If you can see light through the hole, you're 80% of the way there. If not, blow it out with compressed air.
Aim the jet downward, away from your face. A clogged jet can fire debris like a tiny bullet. Hold the jet with needle-nose pliers (not your fingers) and give it a short burst of air, 30 psi is plenty.
In our research, this clears the majority of blockages without ever touching a wire.
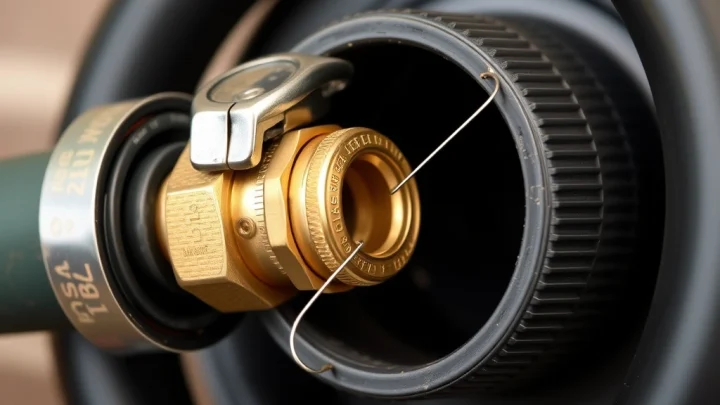
If compressed air doesn't clear it, use a jet cleaning wire of the correct gauge. Push it straight through once, rotate gently, and pull it back out. Never twist, never force, never ream.
The goal is to push debris out, not to scrape the brass.
Step 6: Reassemble in reverse order
Reinstall the jets with hand pressure first, then snug them down. They don't need to be gorilla-tight; the threads are fine and will strip. Float bowl torque on most small engine carbs is light, around 18 to 30 inch-pounds, basically "snug plus a quarter turn."
Reattach the throttle and choke linkages exactly as you photographed them. Reconnect the fuel line. Turn the fuel on slowly and look for leaks before you try to start.
Step 7: Adjust idle and idle mixture
With the engine warm, set the idle speed screw to the OEM spec (usually 1,400 to 1,800 RPM no-load for most small engines). Then adjust the idle mixture screw. Start at the factory baseline of 1.5 to 2.5 turns out from lightly seated, and fine-tune in eighth-turn increments for the smoothest idle.
If the engine now runs cleanly at idle but still has a bog at full throttle, the main jet may need additional attention or the float level may be off. Don't keep twisting the main jet screw; that one is usually fixed.
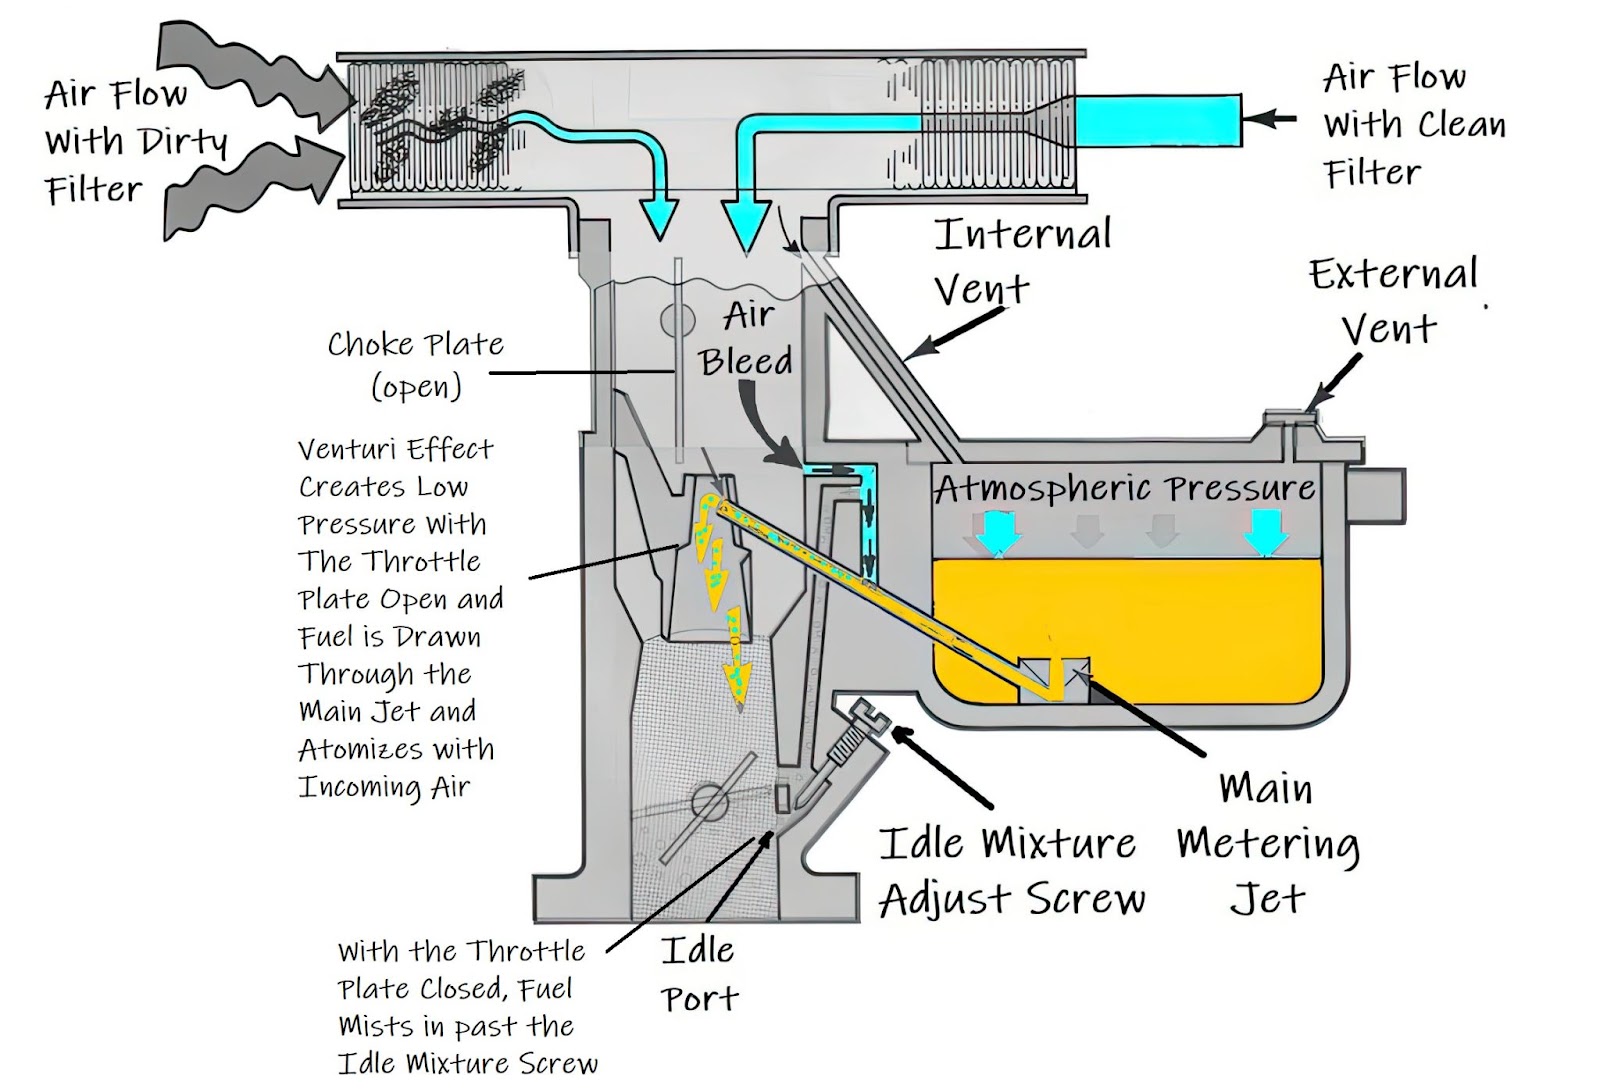
Image source: Bing (Web (fair-use with source credit))
Common Mistakes That Ruin Jets (And the Carb Around Them)
The most expensive repair jobs in a small engine shop usually aren't from people who skipped a step. They're from people who did one wrong step with the wrong tool. A few patterns show up over and over in technician service notes.
- Enlarging the jet with the wrong wire. Once the orifice is oversize, the engine runs rich, fouled plugs, and there's no fix short of replacement.
- Cross-threading the jet on reassembly. Brass threads in an aluminum body are easy to damage. Always start the jet by hand, turning it backward until you feel the threads click into alignment, then forward.
- Lost parts in the bowl. The needle seat clip, the float pin, the tiny spring, all easy to misplace. Lay out parts on a magnetic tray in the order you removed them.
- Mixing up pilot and main jets on a multi-jet carb. They look similar but flow very differently. Label them as you go.
- Overtightening the float bowl. The gasket crushes, the bowl cracks, and now you need a new carb body.
- Spraying carb cleaner on the throttle shaft seal. It dissolves the seal, and the next time you use the engine, fuel leaks past the shaft and drips down the intake.
- Skipping the rebuild gasket kit. Reusing a stretched or hardened gasket is a false economy. They cost a few dollars and save a second teardown.
Aggregate user feedback across small engine forums and repair communities suggests that more than half of "I cleaned the carb and it still doesn't run right" posts come from one of the above mistakes, not from a fundamentally bad cleaning. The cleaning was fine. The reassembly wasn't.
When Cleaning Isn't Enough: Diagnose Before You Soak
Here's a question that saves a lot of wasted time: is a cleaning actually what this carb needs? Sometimes the answer is no.
If the jets are clean, the float is intact, the needle seats properly, and the engine still runs rough, the problem likely lives elsewhere. Common culprits our research points to include:
- Air leaks at the intake manifold gasket. This mimics a clogged jet symptom (lean bog) but no amount of carb cleaning will fix it.
- Bad fuel pump or failed pulse line. On small engines with a pulse-driven fuel pump, a cracked line starves the carb regardless of how clean it is.
- Worn throttle shaft. If you can see daylight around the throttle shaft when the plate is closed, it's pulling unmetered air in. The carb needs a rebuild or replacement.
- Damaged float. A fuel-soaked foam-filled float sinks and floods the engine. Shake it next to your ear; if it sloshes, it's shot.
There's also a judgment call on age. If the carb is more than 10 to 15 years old, the casting is corroded, the threads are stripped, and you've already replaced a jet, a new aftermarket carb (often $30 to $80 for common Briggs and Honda models as of 2026) is usually the smarter move. Rebuilding a carb that costs less than the rebuild kit doesn't make sense.
Cleaning is the right call when the carb is structurally sound, the failure is recent (after sitting with stale fuel, for example), and the engine is worth keeping. Skipping the diagnosis and just cleaning is how people end up doing the same job three times.
FAQs About Cleaning Small Engine Carburetor Jets
Can I clean a carburetor without removing it from the engine?
Yes, but only for light surface varnish. A spray-through cleaning reaches the throttle plate and idle circuit. It does not clear a clogged main jet sitting at the bottom of a fuel-filled float bowl.
For a real blockage, removal is required.
How long should I soak carburetor jets?
Manufacturer directions typically call for 5 to 30 minutes in carb cleaner dip. Stubborn varnish may need a second soak. Anything beyond an hour rarely helps and can start attacking plated surfaces on the jet.
If two soaks don't clear it, the jet is probably damaged and should be replaced.
What size wire do I use to clean a pilot jet?
Use the exact gauge for the jet. A jet cleaning wire set (Denco, Motion Pro) costs around $10 and includes the right sizes for the common #35 to #130 range. One strand, pushed straight through once, no twisting.
Larger wires will score the brass and ruin the jet.
Can I use WD-40 to clean a carburetor jet?
WD-40 Specialist Carb Cleaner is fine for surface spray. Regular WD-40 is a light lubricant and water dispersant, not a varnish solvent. It will not dissolve the gummy deposits that clog jets.
Stick with a real carb dip or spray for the soak.
Will a clogged jet prevent the engine from starting?
Yes, especially the pilot jet. The pilot circuit handles idle and low-RPM fuel. A fully blocked pilot jet means no fuel at closed throttle, and the engine will start, run for a second on choke, then die.
That classic "runs on full choke only" symptom is almost always a pilot jet.
Is it worth rebuilding an old carburetor or just replacing it?
Replacement wins for cheap carbs under 10 to 15 years old. A new aftermarket unit is $30 to $80 for common Briggs and Honda models, while a rebuild kit plus cleaner runs $20 to $40. Rebuilding is the right call for OEM carbs that are no longer made, or for vintage small engines where originality matters.
Final Recommendation: Save the Carb, Skip the Headache
A proper jet cleaning isn't complicated, but it is detail work. Pull the carb, label the jets, soak them, blow them out, and put everything back the way it came off. That's the 90% solution for most rough-idle and bog-under-load complaints on small engines.
Skip the shortcuts. Don't use a drill bit. Don't skip the rebuild gasket.
Don't force a stuck jet. And don't keep twisting the idle mixture screw past two and a half turns out; you're in the wrong place.
If the carb is old, corroded, or has stripped threads, replacement is usually smarter than rebuilding. As of 2026, aftermarket carbs for popular small engine platforms are inexpensive and pre-jetted from the factory. You'll save an hour of teardown and end up with a known-good fuel system.
For seasonal storage, drain the float bowl or run the engine dry before parking it. A few minutes of prevention in the fall saves a carb cleaning in the spring. That's the real long-term fix.

Similar Posts